
Use your VPS to hide local IP address + Bonus: alias examples + limit RAM and CPU usage + script to download youtube and playlist
I am lazy to translate to Serbian, IT commands explanations are better in English, this is small tutorial while I edit and publish videos and news from protest 16th august and other days….
So, if you want to use your remote server to hide your real local IP…. it is one minute job, you don’t need VPN.
Most VPN are owned by shell and offshore companies and real hidden owners are security companies that profited from state departments, they can not be trusted. They just sell story about privacy.
So, in my example, I disabled password login on my server and I am using ssh key, for example like this:
sudo ssh -i ~/.ssh/berlin/id_ed25519 root@111.22.133.60
As you can see I created special folder berlin for my server ssh key and it will ask for password when I use this command.
if you use only password for your server just use it without command for key “-i …519”
Let’s start with this job.
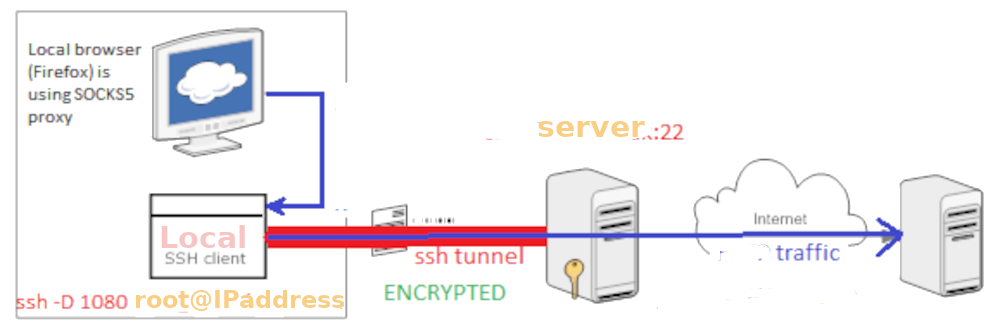
You need to create a SOCKS5 proxy tunnel from your machine to the server using this command:
ssh -i ~/.ssh/berlin/id_ed25519 -D 1080 -N root@111.22.133.60
What this does:
-i ~/.ssh/berlin/id_ed25519: Your SSH private key.
-D 1080: Dynamic port forwarding on local port 1080 (SOCKS5 proxy).
-N: No remote command (just tunnel).
root@111.22.133.60: Your server.
Let’s do it now in script to start it whenever we want.
1. create script for example in linux user folder ~:
nano ~/start-proxy.sh
inside of this file copy paste next lines:
#!/bin/bash
ssh -i ~/.ssh/berlin/id_ed25519 -D 1080 -N -f root@111.22.133.60
To close nano editor just press ctrl O then Enter and then ctrl X
Explanation:
-f: Forks the process into the background after asking for the passphrase (if needed).
-N: No remote command.
-D 1080: SOCKS proxy on local port 1080.
Note: if you use sudo ssh… you must also use later sudo pkill…
2. Make your script executable:
chmod +x ~/start-proxy.sh
3. Run it when needed:
~/start-proxy.sh
to stop it: pkill -f “ssh -i ~/.ssh/berlin/id_ed25519 -D 1080”
BUT it is better to create alias:
Add this to your ~/.bashrc or ~/.zshrc, I use zshrc:
alias startproxy='~/start-proxy.sh'
alias stopproxy='pkill -f "ssh -i ~/.ssh/berlin/id_ed25519 -D 1080"'
Reload shell: source ~/.zshrc
Now you can just type:
startproxy
stopproxy
But after startproxy, to be able to use firefox with this set up, you need to:
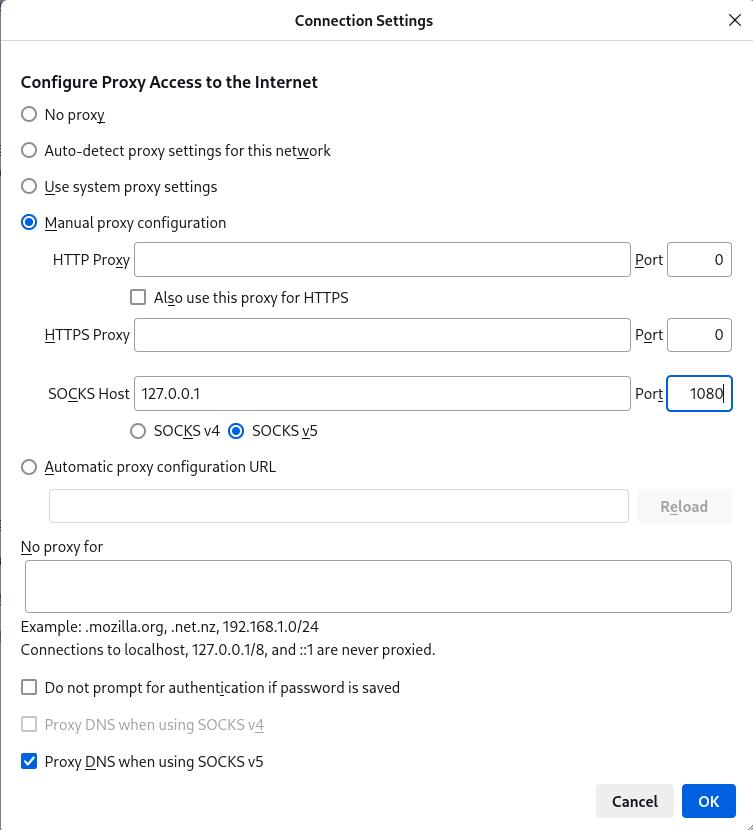
Set up SOCKS proxy in Firefox:
Go to:
about:preferences (Edit-Settings) → Network Settings → Manual Proxy
SOCKS Host: 127.0.0.1
Port: 1080
SOCKS v5
Check “Proxy DNS when using SOCKS v5”
Check is it working by visiting: https://myip.ms/
You should see IP address of your server 111.22.133.60
That’s whole job, you didn’t touch server, you didn’t install VPN, you just use simple command socks5 proxy tunnel + creating script and alias for easier daily usage.
Oh yes, if chromium or chrome doesn’t have proxy modifications like in my Linux, you must start chromium/chrome from terminal with socks5 parameters:
chromium (or if you have: google-chrome) --proxy-server="socks5://127.0.0.1:1080"
Additional information about security: The SSH protocol is a cryptographic network protocol, so this entire tunnel is encrypted. This protects your traffic from being intercepted or viewed by anyone on your local network (e.g., at a public Wi-Fi hotspot or your ISP). IF you visit HTTPS website and I think most website today don’t use HTTP, whole connection, from server to website also, will be encrypted. IF you visit HTTP website, after server your connection is not encrypted. Once your traffic arrives at the remote server, it exits the SSH tunnel and the rest of traffic depends on website you visit, HTTPS or HTTP, but website will in any case catch your IP of server and not your local real IP address, so, anonymity stays actual even if you use HTTP.
If you want to use OpenVPN that’s more complicated, you need to install several files, ca cert ta and so on, on the server to create server.conf and finally download client.conf that will be used by local openvpn and if something is wrong, openvpn will fuck up your internet connection… in theory you can stop openvpn with ctrl C but in reality, you must kill PID process (sudo kill -9 PID-11122) + sudo ifconfig down tun5 or whatever openvpn created the interface, after that you can correct mistakes, it is better to use TCP instead of UDP and some server free port like 8080 that is not blocked at your school or anywhere you use the internet, it is better tls-crypt than tls-auth and to prevent that openvpn overtake whole your connection, you can add in local client.conf: route-nopull and if ciphers is deprecated, use this line:
data-ciphers AES-256-GCM:AES-128-GCM:CHACHA20-POLY1305:AES-256-CBC
Bonus – Alias + limit overloading CPU/RAM + youtube download
If you never heard for alias, here are several examples you can include in .bashrc or .zshrc in your user folder, if you want to avoid typing the same commands million times… don’t forget after all to refresh shell, in my case command is: source ~/.zshrc
alias list='ls -la -h' # -h gives you human readable format without million numbers of bytes when you list files in folder
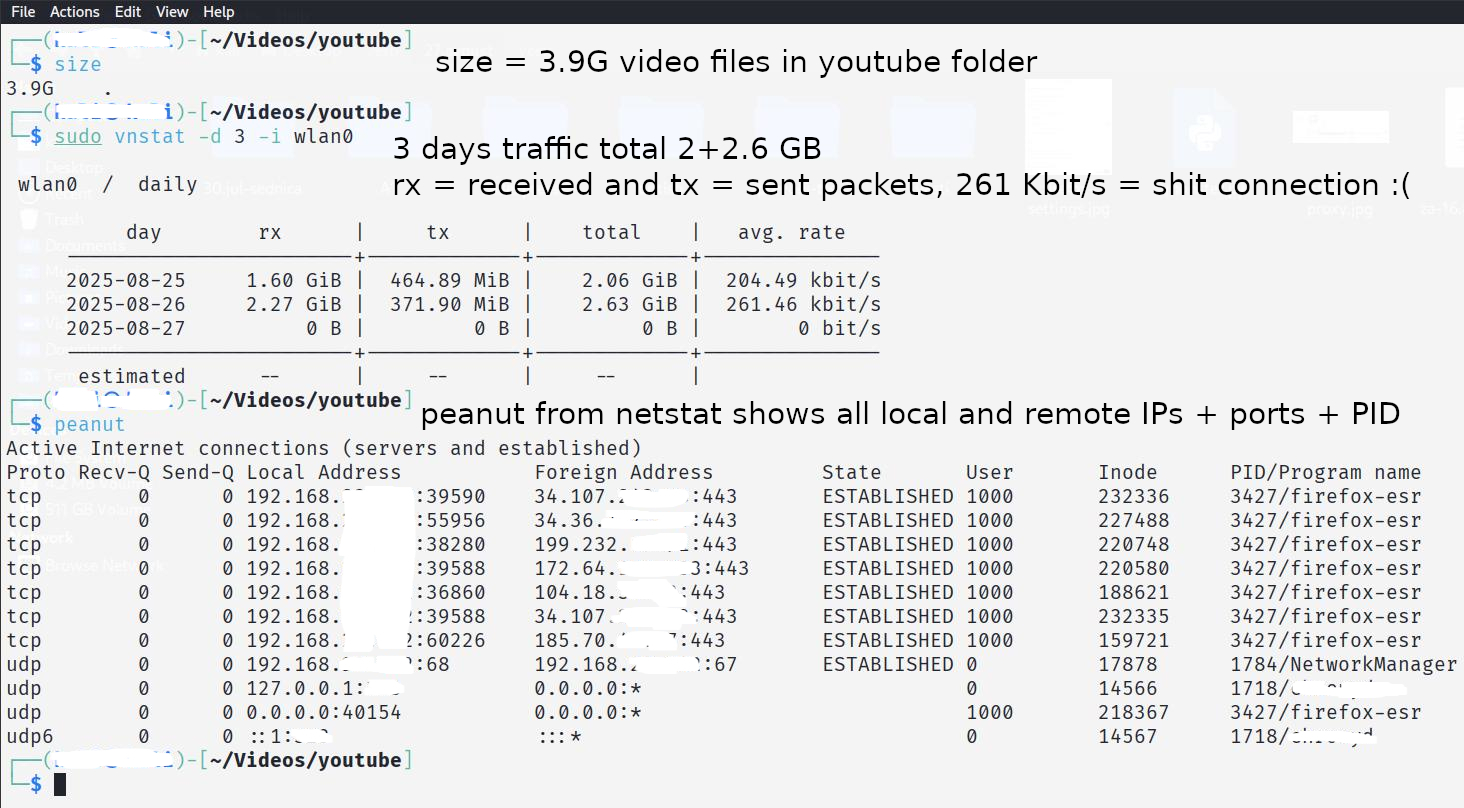
alias size='du -sh' # it will show you total size of files and folders without to list all of them for example 8.5G
alias update='sudo apt-get update'
alias upgrade='sudo apt-get full-upgrade'
alias install='sudo apt-get install'
# if you have server in berlin, use alias berlin with ssh key:
alias berlin='sudo ssh -i ~/.ssh/berlin/id_ed25519 root@222.444.555.66'
# if you use tor in proxychains to hide your IP:
alias berlin9050='sudo proxychains4 ssh -i ~/.ssh/berlin/id_ed25519 root@222.444.555.66'
# if you have one more server + higher ssh port 32222 + changed username:
alias nirvana='sudo ssh -i ~/.ssh/nirvana/id_ed25519 -p 32222 travolta@187.113.57.123'
alias tor='sudo systemctl restart tor'
alias netstat='sudo netstat -tpln' # this will show you used ports and tools using it
alias peanut='sudo netstat -peanut' # more info about all established connections, tools and ports + local and remote IPs + PID
alias vnstat='sudo vnstat -m 1 -i wlan0' # vnstat gives you information about traffic/bandwidth, hourly -h 24, daily -d 10, monthly -m 1...
alias frame='mediainfo --fullscan *.mp4 | grep "Frame count"' # this will show you how many frames you have in *.mp4 video file/s in your folder, I need to know that when I wait for compression or conversion
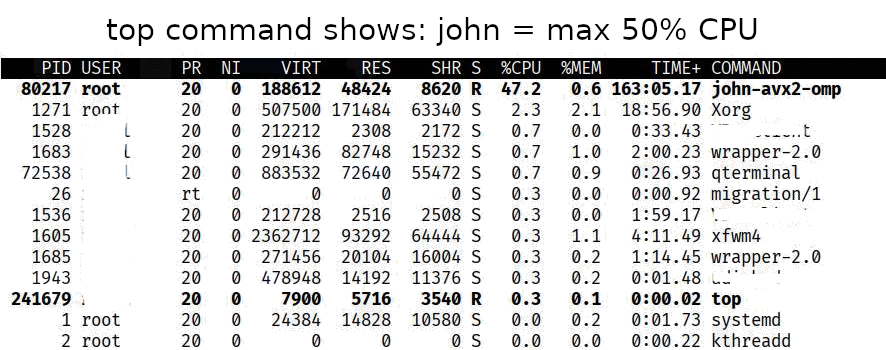
Some things can not be done simply with one line alias, so, if you think some software you use overload processor, just use this command cpulimit40 after you include this in .zshrc:
This alias limit all tools to use cpu 40%, for example command will be cpulimit40 john ….
john is used to attack hash to discover password, john overload 900% CPU while ffmpeg overload 800% RAM
cpulimit40() {
cpulimit -l 40 -- "$@"
}
This function will allow you to limit any app’s RAM usage by specifying a percentage, copy paste this bold code in your .zshrc or .bashrc file.
# example: limit-memory 50 ffmpeg -i input.mp4 -c:v libx265 output.mp4
# example: limit-memory 50 google-chrome or firefox
limit-memory() {
# Limit the command to a percentage of available RAM (default 50%)
local percent=${1:-50}
shift
systemd-run --scope -p MemoryMax=${percent}% "$@"
}
And to limit memory usage 50% while compression of mp4 files, ffmpeg can overload RAM 800%, final command is limit-compress in folder with video files. If you want to add and limit for CPU, just add it when you are inside of folder with files mp4: cpulimit40 limit-compress
limit-compress() {
limit-memory 50 zsh <<'EOF'
for f in *.mp4; do
# Get frame count using mediainfo, if you don't have it, install mediainfo
mediainfo --fullscan "$f" | grep "Frame count"
# Compress video using H264 codec and MP3 audio
sudo ffmpeg -i "$f" -vcodec h264 -acodec mp3 "${f%.mp4}-compressed.mp4"
done
EOF
}
If you would like to download video from youtube with eng subtitles if possible, install yt-dlp and make script like this.
I created youtube folder in Video folder (/home/user/Videos/youtube) that’s the best place for next script called “youtube-sub.sh“:
Make new file i.e. script in youtube folder:
nano youtube-sub.sh
copy paste inside:
#!/bin/bash
# Check if URL is provided
if [ -z "$1" ]; then
echo "Usage: youtube <YouTube URL>"
exit 1
fi
# to download restricted videos you must be logged into youtube and use cookies from firefox, just add this line: --cookies-from-browser firefox \
# this script run yt-dlp with English subtitles and convert it to SRT format
yt-dlp \
--write-sub \
--write-auto-sub \
--sub-lang "en,en-orig" \
--convert-subs srt \
--no-check-certificates \
--verbose \
"$1"
# so, the final command is as echo says: youtube https://www.youtube.com/watch?v=krrrkkk1234
Now make this script executable:
sudo chmod +x youtube-sub.sh
And finally add it as alias in conf file of your terminal .bashrc or .zshrc
alias youtube=’/home/user/Videos/youtube/youtube-sub.sh’
Refresh your zshrc with command: source ~/.zshrc
You can also download whole playlist from youtube the same as above script just use next commands, in this example below, download ends at video number 100… and make the script executable and add alias for example alias playlist=’…..’ so final command will be: playlist “https://www.youtube.com/watch?v=2w61123456&list=PLNeVp2Q4WzngMVR7123456”
yt-dlp \
--verbose \
--no-check-certificates \
--no-part \
--yes-playlist \
--playlist-end 100 \
"$1"
Aaand don’t forget if you download whole playlist with 100-300 videos, you will spend more than 10GB of your internet traffic in one day, in west europe they sell internet on the basis of speed of connection, they don’t care for upload and download but it is not like that in Serbia. vnstat can show you how much you spent traffic for example today: sudo vnstat -h 24 -i wlan0 …if you don’t know the name of interface, check with ifconfig and you will see wlan0 or eth0 or ens3 and similar…